Getting Started
Install
npm i @lloydjatkinson/astro-snipcartSnipcart API key environment variable
Firstly make sure to have read how to define and read environment variables in the Astro documentation.
This integration requires an environment variable named PUBLIC_SNIPCART_API_KEY. Remember, do not hardcode magic strings and do not commit secrets to a repository.
Snipcart allowed domains
Snipcart by default does not allow any site to use your API key. You need to configure it to allow your domain.
CI/CD - GitHub Actions
If you are using GitHub Actions as your build pipeline then you can use secrets and environment variables. Here is a job that allows a project using Astro Snipcart to access secrets as environment variables.
- name: Setup environment variables env: PUBLIC_SNIPCART_API_KEY: ${{ secrets.PUBLIC_SNIPCART_API_KEY }} run: | # cd astro-snipcart-shop # optional step for monorepos etc touch .env echo PUBLIC_SNIPCART_API_KEY="$PUBLIC_SNIPCART_API_KEY" >> .envSetting up Snipcart
This component is required to be imported into the <head> of your site. This could be in a hypothetical base layout/application shell type component. For example consider a typical BaseLayout component.
⚠ Take note of the
/astroin the import path. This is to future proof the integration if or when other client side frameworks also get specific support by this Astro integration.
---import { SnipcartSetup } from '@lloydjatkinson/astro-snipcart/astro';---<html> <head> ... <SnipcartSetup /> </head> <body> <slot /> </body></html>Allowing a customer to open their cart
Now that <SnipcartSetup /> has loaded Snipcart it’s time to start using the other components the integration provides.
---import { CartCheckout } from '@lloydjatkinson/astro-snipcart/astro';---<BaseLayout> <CartCheckout> <button> Open basket </button> </CartCheckout></BaseLayout>Clicking the button should now open the basket with a Your cart is empty. message.
Defining your first product
Remember, Snipcart is a code-first approach to creating an e-commerce shop. That is, products are not configured from within Snipcart. This puts you and your application in full control of product definitions.
Your products can therefore be setup flexibly, such as:
- Simple Markdown files with the frontmatter containing the YAML frontmatter defining the title, price, variants, etc.
- JSON files
- Your own backend API
As long as the end result is HTML that Snipcart can scrape (or a custom JSON returning API) during it’s order validation phase of the transaction then it does not matter where the product definition resides.
---import { Product } from '@lloydjatkinson/astro-snipcart/astro';---<Product as="span" id="SKU-0001" name="Standard T-Shirt" url="/product/standard-t-shirt" price={12.99} description="Every day basic t-shirt" image="/blue-t-shirt.jpg"> <button> Add </button></Product>A minimum viable e-commerce store
This is a minimal example of a Snipcart e-commerce store. If adding the product to your cart works then you know that you have setup your Snipcart account correctly and can proceed further.
⚠ Remember, you need to have set the PUBLIC_SNIPCART_API_KEY environment variable in your .env file. You also need to have configured in your Snipcart dashboard your allowed URL(s) of your site - this is a security feature.
---import { SnipcartSetup, Product, CartTotalPrice, CartItemsCount, CartCheckout} from '@lloydjatkinson/astro-snipcart/astro';---<!DOCTYPE html><html lang="en"><head> <meta charset="UTF-8"> <meta http-equiv="X-UA-Compatible" content="IE=edge"> <meta name="viewport" content="width=device-width, initial-scale=1.0"> <title>Minimum Viable E-Commerce Site</title> <!-- Don't forget, you need to setup a .env file with the key PUBLIC_SNIPCART_API_KEY in your Astro project root --> <SnipcartSetup /></head><body> <main style="padding: 2rem; display: flex; flex-direction: column; gap: 1rem;"> <div> Your cart contains <CartItemsCount /> items with a total of <CartTotalPrice />. </div> <div> <Product name="Box of fruit" price={7.99} id="box-fruit"> <span> Click here to add a box of fruit to your shopping bag </span> </Product> </div> </main></body></html>Remember, Snipcart needs to know which URL to load to query as part of it’s order validation. You’ll likely have a page for each product, so you could pass that URL to the
urlprop.
Component props, TypeScript definitions, and Snipcart attributes
The components in this integration expose the same functionalities described in the Snipcart products definition documentation.
For example, to make use of the custom fields functionality use the component like so:
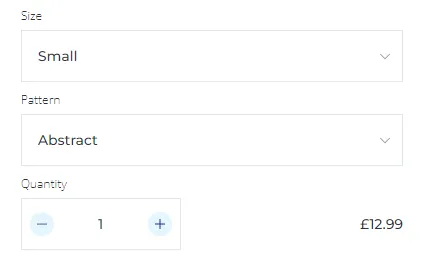
<Product as="span" id="SKU-0001" name="Standard T-Shirt" url="/product/standard-t-shirt" price={12.99} description="Every day basic t-shirt" image="/blue-t-shirt.jpg" customFields={[ { name: 'Size', options: ['Small', 'Medium', 'Large'], placeholder: 'Choose size', required: true }, { name: 'Pattern', options: ['Abstract', 'Neon', 'Tiger[+5.00]'] } ]}> <button> Add </button></Product>When the customer adds this product to their basket they will be presented with the following:
